 We’re just about at year 2 in this house, and I’m excited for the changes ahead! In my 2021 Project List, I shared the mood board for our Laundry Room. If there’s one thing I’ve learned along the way is that progress is slow and doing it yourself is slower. The number one reason for this project was to gain functionality in that space. The layout was terrible, and without doing any major changes, I came up with a plan to maximize the unused spaces just by changing out the countertop material. If we eliminated the laminate and swapped to wood, I could make use of that space both on top of and underneath the countertop by incorporating a hinged design. There were many things to consider in choosing which type of wood was best for the project, so I’ve put together the list we worked through and hope you find it helpful while you’re deciding which wood to choose as well. What types of wood are good to use for a laundry room countertop?For us, this was all about durability. If you plan on your countertop getting lots of use, you’ll want to consider a hard wood like maple, hickory, beach, or cherry. For lighter use projects like ours, we considered ash, soft maple, and oak. Red Oak is ultimately where we landed because I liked its level of durability and the warm color tones looked great in our space. If you have a sink in your space, you’ll want to be sure to properly seal the wood to protect it from any possible water damage. How much use will the countertop get?This is the very first thing you should consider when choosing a countertop. For us, our Laundry Room is essentially only used for folding clothes. However, there would still be times a laundry basket may be sat on it, or heavy detergent bottles while I put them away on the shelves. So that eliminated Pine for us. Pine is a soft wood and even the drop of a laundry basket would dent it. Are wooden countertops expensive?They’re not the most expensive option out there, but they’re not the cheapest option out there either. I would consider them more of a middle of the road material in terms of cost. This is all relative to what type of wood your purchase and where you purchase it. We bought ours at a local hardwood dealer and paid just under $300 for our 9ft countertop. How lOng Do wooden countertops last?Everything I’ve read said that wooden countertops lasted anywhere from 10-20 years, depending on use. For us, we don’t have a utility sink in our Laundry Room, so water isn’t an issue, and if we mainly use it for folding clothes, I think it’ll get us to that 20 year mark, no issues. What do you seal laundry room countertops with?We sealed our wooden countertops with a simple water based polyurethane. We tested a few finish coats on a cut off, and noticed a bit of a color change with the oil based option, so I opted out of that option. If you have a sink in your laundry room, you’ll want to be sure to properly seal the wood with a waterproofing sealer. I’ve been using the countertop for a few weeks now and absolutely love it. We’re installing the hinged part of the countertop tomorrow, and I can’t wait to make use of it! If you missed it, be sure to check back on our Laundry Room mood board. And then head on over to our 2021 Project List to see what else is coming!
4 Comments
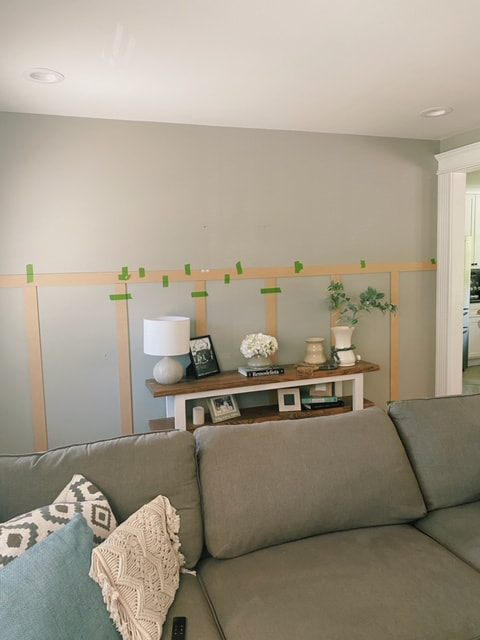
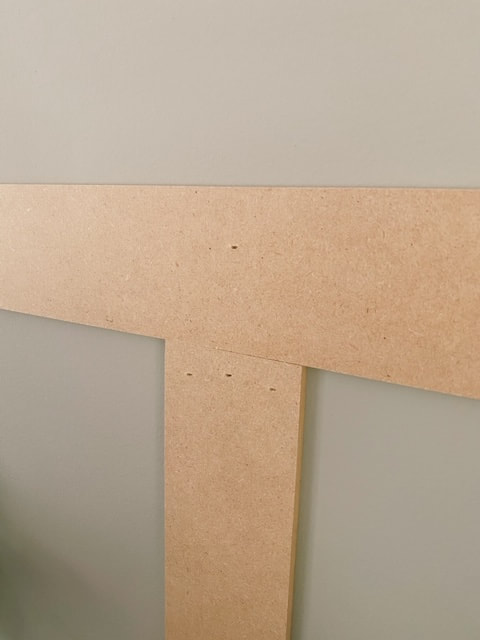
 Board and Batten is a beautiful and super easy wall application to do yourself. It’s timeless in design, adds SO much character to a blank wall, and I did it all by myself in one weekend! It's no secret that I've had a hard time connecting with this house. Our house on Dresden gave me all the feels the second we walked in the door for our first viewing. It was an older home, built in 1913. This new house was missing that old charm and the character I loved so much. We've been here for over a year now, and honestly, I'm not sure why it's taken me so long to get a move on adding in that charm? Sure, I'm a Mom now and that takes a lot of time and energy. But now I'm ready to move at a rapid pace to love where I live. First stop, the entry wall. Step 1: Find Your Desired Dimensions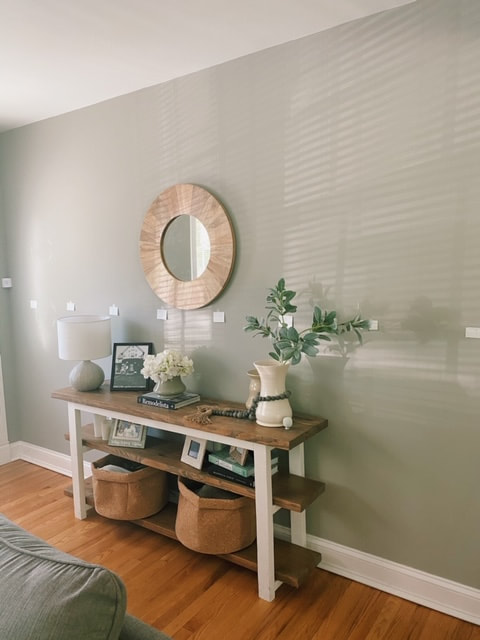 After lots and lots of research, I was finding that many other DIYers were using 3" boards, and spacing them out 13 inches. I measured out 3 inches on a sheet of paper, and cut them out so that I could visually see if I liked how it looked on my wall. Because these MDF cuts are so lightweight, there really was no need to attach these to the studs. I mean, if painter's tape can hold them up, you're good. 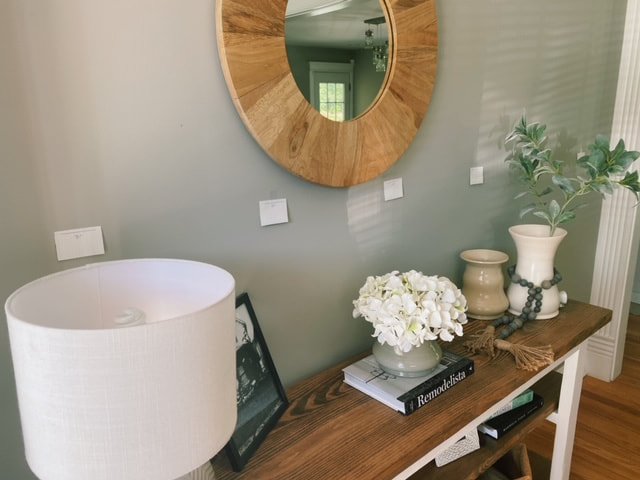 Step 2: Test RunThe spacing looked good, but once I started taping my MDF boards in place before nailing in, I realized the spacing wasn't working well with my outlet, so I adjusted them as needed to work better with my space. I ended up using 6 boards, spaced 18 inches apart. If I could tell you only one important thing for this entire project, it's to TAPE YOUR BOARDS TO THE WALL BEFORE ATTACHING WITH NAILS. Had I not, I would've been cutting around an outlet...which is more annoying than anything. 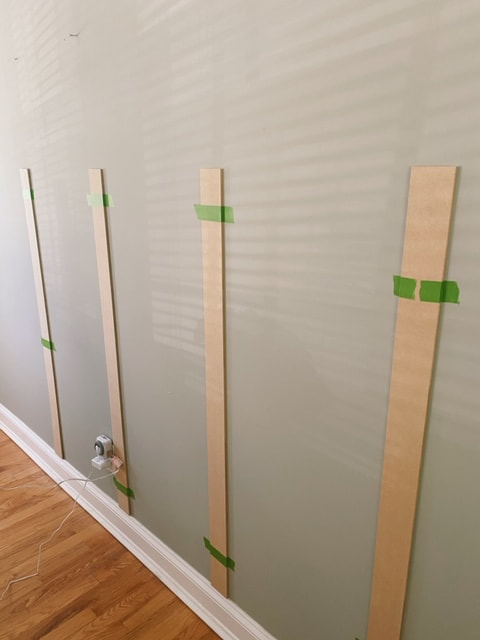 Step 3: Level UpAlso, it's extremely important to make sure your boards are level!! Can you imagine how this would look if you got lazy with this step?! I'll save you the imagination and just say it would be bad. Really bad! 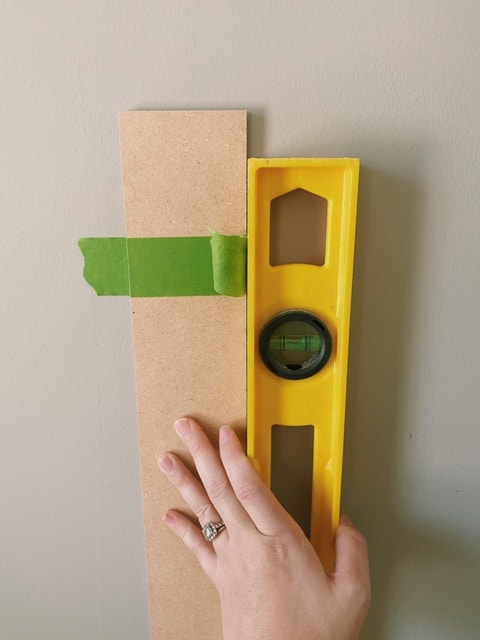 Step 4: Nail Boards to WallFor this step, I borrowed the Hubby's nail gun. You can complete this step with a good ole' fashioned hammer and nail combo, but if you have access to a nail gun, it's a no brainer. This step went SO quickly!
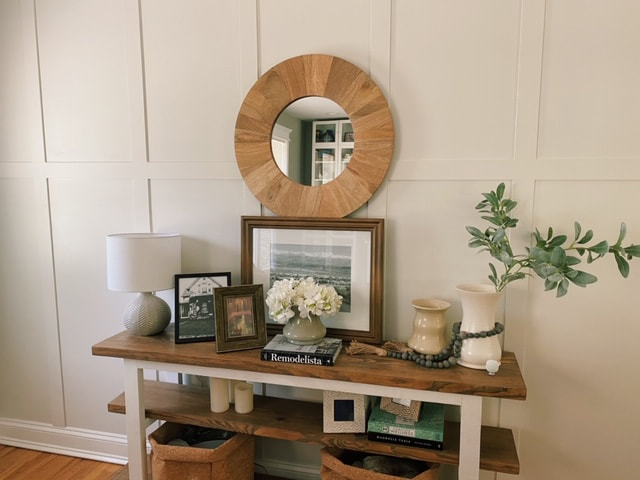
Step 5: Assess Your WorkAfter it was all up, I stood back to see if I was satisfied. Let's just say that I was more satisfied with Lenna actually smiling for the camera than I was with the wall. Our ceilings at our house on Dresden were 9ft tall. This house is the standard 8, and I miss the drama the tall ceilings gave. So I decided to bring the board and batten ALL the way up! 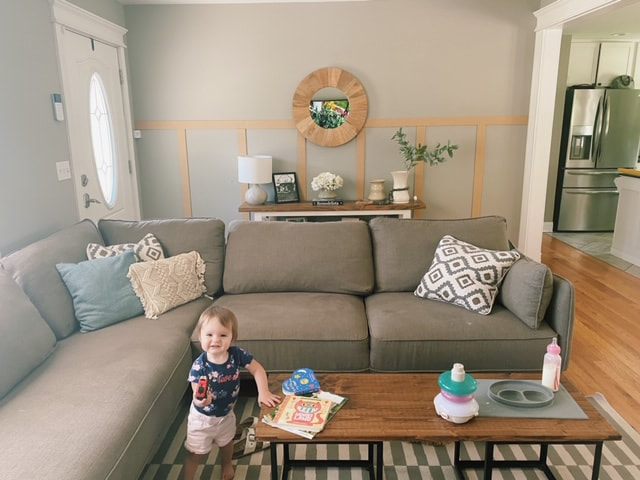 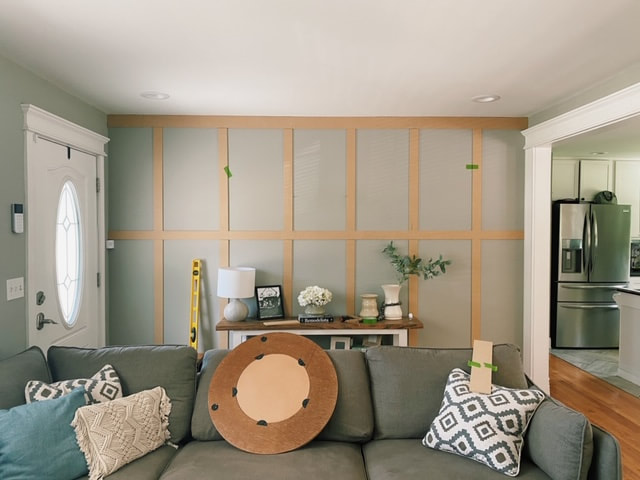 I decided that I really liked the look of two (uneven) sections. Both are rectangular, but the bottom half of the wall is a taller section than the top. I know a lot of board and batten applications feature a square section, but I just didn't like how it looked in my space. 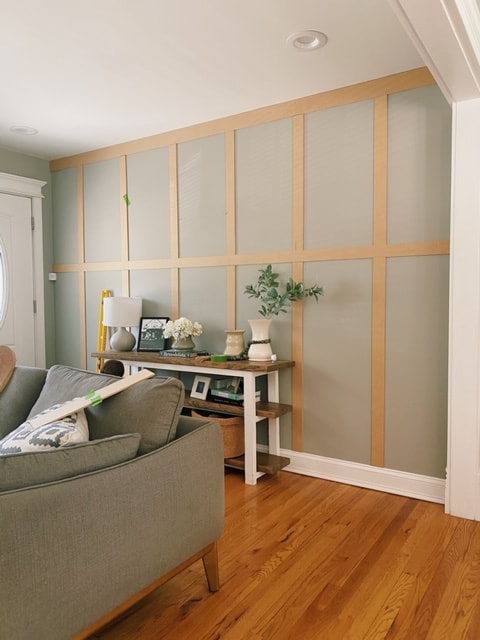 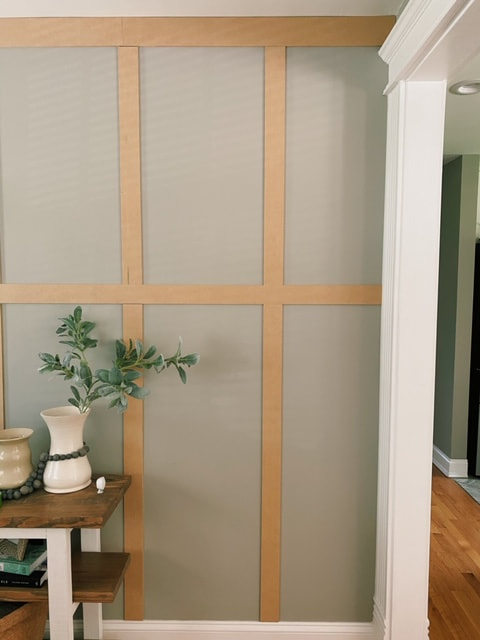 Step 6: Finishing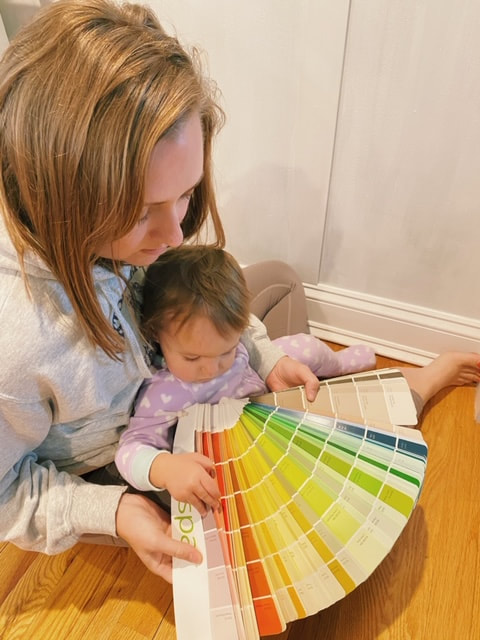 Filling nail holes, sanding everything down, and painting. This step was BY FAR my least favorite. -Although I loved that Lenna was so anxious to get in and help me choose the perfect paint color! ;) It's not that any of this was hard to do. It was just so much more time consuming than everything. The details really do matter here because if you don't use a little finesse, you'll see it. My biggest obstacle here was the walls themselves. Although these walls are newer than the walls in Dresden, they weren't perfectly straight. There's a spot right at the front door where the MDF boards didn't meet up perfectly due to a curve in the wall, but since the wall and the boards are painted the same color, you really can't tell. 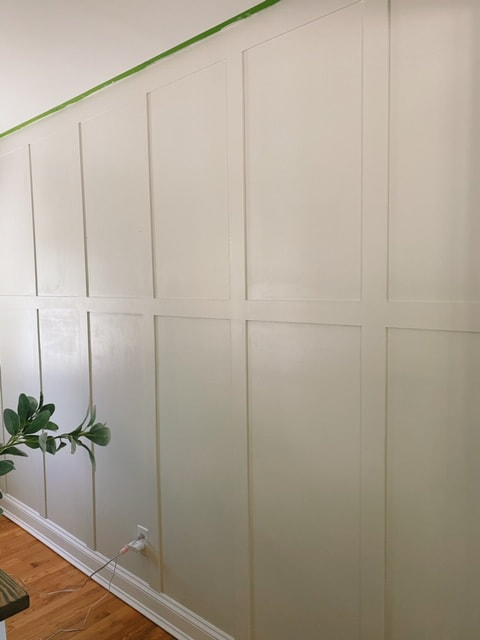 I struggled a little choosing a paint color for this wall. I wanted to go with a traditional white, but when I got it up on the wall, you lost the beautiful detailing of the trim. I thought about a dark accent wall, but since our space is so small, I was afraid it would be too dramatic. I don't know, I may change my mind down the road. With the help of my Instagram followers, I landed on a color very similar to a color we used over at Dresden. The color is Benjamin Moore Dove Wing. It's a creamy white, and in my space, works well with the grey walls we have everywhere else. ...although I'm now thinking that I love the reminder of Dresden SO much, I may paint the rest of the house this color too. And maybe then I'll change the color of this entry wall. Stay tuned! 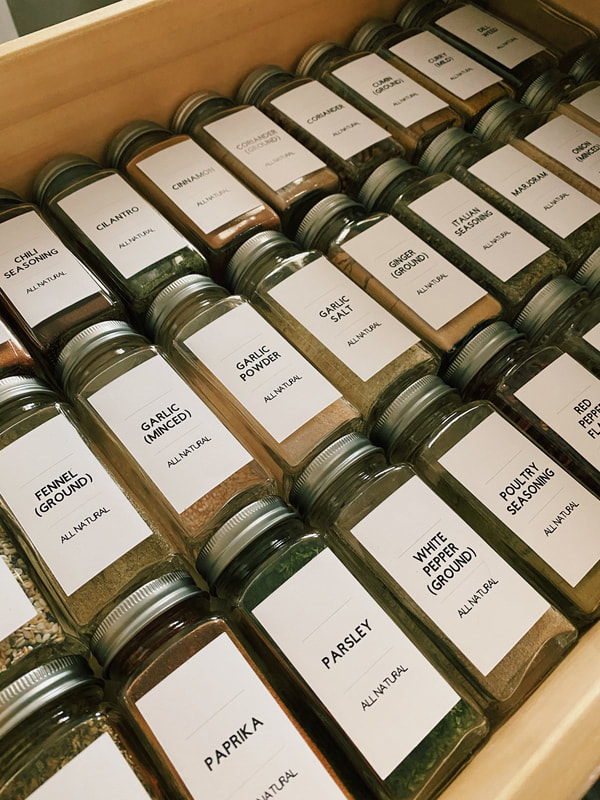 We all dream of what our dream home looks like, right? Well, mine is clean (does anyone actually dream of a dirty house?!), filled with lots of natural light, and very well organized. I can't help but scroll through Pinterest or Instagram and hate everything about my kitchen situation. For those of you who have been here with me since the beginning, you're familiar with our first home -the true Dresden Avenue. I loved that house so much for all of it's original charm and character, but the pantry situation was bad. It was about 24 inches wide, only 6 inches deep, and had maybe 5 shelves. It was rough, but we made it work since at the time, it was only Dane and I. When we decided to move, we knew our next house would be where we would raise our babies, so I had imagined a pantry big enough for our future family. I even created a Pinterest board to save all of my inspiration and organization ideas. Well, as luck would have it, we found a house that had a separate garage space for our workshop, it was newly remodeled and had SO much yard space for our pups. The problem was that we would be going from a very small pantry situation, to no pantry at all. You win some, you loose some. I'm always up for a good challenge, so I'm setting out to create the organized kitchen I've always dreamed of, with or without a dang pantry. So first up was my dream spice drawer. Something about having them all laid out, easily seen, with pretty labels just nerds me out. Dane thinks I'm psychotic, but whatever. Maybe I am. I bought the glass spice jars on Amazon for a great deal! You can find the exact jars I bought here. I bought 36 of them, and they come with a collapsible funnel, plastic shaker lids, the metal caps, 2 kinds of jar labels, and a chalk marker. Obviously I didn't have a need for the labels, but I kept them so that I could use them for any future projects I may come up with. Maybe I can use them when creating and organizing my pantry?! I have a Cricut Maker, so I was determined to make the custom labels myself. They are inspired from the labels I found on this Etsy shop. The only thing I didn't like about them was the numbers on them. I really don't think I could've lived knowing I had missing our out of order numbers, so I nixed those. But most everything else is very similar. I think I may have Dane build me a spice holder to slide into this drawer so that the tops sit up a little higher. I think it may make it easier to get them out of the drawer when I need them. Most of the spices I have are ones that I've gotten from the grocery store, but I do have a few that I've put together myself. You can find my Everything Bagel recipe here, and my Fajita seasoning blend here. My next project will be organizing my fridge and putting together a pantry in one of our cabinets. Be sure to follow along over on my Instagram page, and send any and all inspiration my way! As always, thanks so much for stopping by! XO -Heather
|